Monday 31 December 2012

Get there early and reap the rewards…

A week ago, the day before Christmas Eve, I was in Wales visiting relatives. The plan was to spend the saturday just visiting and use the sunday for a photographic mission to the Gower Peninsular - where I grew up as a boy.


All through the previous day and into the night, the rain had been scything down and all the rivers were in full flood, so it wasn't looking good for the following morning. I decided to set an alarm anyway and as luck would have it - the rain stopped during the night and the skies were clearing. I'd pre-decided to visit Three Cliffs bay - one of my all time favourites - and headed off in the dark.

Many people wouldn't think to visit the beaches in winter, but I've always preferred the wilder coastal spots over the more popular holiday spots, so as the days get shorter, I have more of the beach to myself! The bay I'd chosen, isn't all that accessible and you have to walk for a couple of miles to get to it, so it's usually fairly empty, even in July. When I finally got there, there was just me and a foraging fox - and he took off as soon as he saw me. As the sun slowly rose, I had a great couple of hours shooting - the sky was still heavy with water and the sea was in full rage at high tide - much more dramatic than it's calm summer persona.

I've added one of my favourite shots from the day above. I took this using a new Nikkor 10-24mm wide angle zoom that I bought recently (It's a really great wide angle lense - if you're a Nikkon user and looking for one, I am really pleased with the results it gives). This shot was taken using an ND8 neutral density soft grad to balance the sky and get more cloud definition and I blended 2 exposures in photoshop to get the final image.

There are more images posted on my google + page - if you're interested, have a look, I'd value your feedback!

https://plus.google.com/u/0/103320240261166592824/posts

I urge you to give a winter dawn shoot a go - you'll have a great time and due to the light and weather, the results are often much more theatrical, offering great picture opportunities. If you plan properly in advance, you'll have a great days shooting - here are a couple of quick tips to make the day run smoothly:

• Check and pack your equipment the night before and then leave it all by the front door 

• Make sure your footwear and winter clothing are suitable - nothing ruins a day faster than being cold and miserable and this is so easily avoided by preparing better.

• Take plenty of batteries and memory.

• Allow plenty of time to get to your destination, park up and hike out to your chosen spot - ideally you want to be there with your gear set up as the first colour creeps into the sky so you can make the most of it.

• Pick a place you want to shoot - and stick with it. Planning ahead makes your chances of success that much better, so pre-visiting a site is a good way to work out where you'll need to be when the sun rises.

• If you're going to a new spot that you haven't visited before, get a good map (Ordinance Survey in the UK) and a compass. This way you can get a good idea which way the sun is going to travel across the area. You don't want to be rocking up to a site in the pre-dawn only to find that the shot you were planning only looks good at sunset! 

Finally - as the days are so short, dawn is at 8.00 am and sunset at 4.00 pm, so you don't even need to get up really early or stay out late! What are you waiting for - get out there and start snapping!


If you're enjoying these posts, why not leave me some feedback - I'd like to hear from you - and why not click to follow.  Good shooting!


Sunday 30 December 2012

Essential Kit No. 4…

LED Head Torch – safety first - safety second!


One of the great hidden truths about taking landscape images is that - to get the stunning view, you will need to walk, sometimes a couple of hours over rough terrain. I came to photography through a love of the outdoors, so the mountain and hiking aspect comes as no surprise to me, but in all the magazines and books I've read on the subject - very few mention that you are likely to need to equip yourself to be safe and comfortable in the middle of nowhere!


Writers always stress the importance of the "golden" hours at dawn and dusk - when the light quality is at it's best, throwing long soft shadows and putting the maximum colour and drama into the sky. If you've ever looked at an image of a stunning winter mountain sunset or beautiful summit sunrise, the question that most people aren't asking is - "how the hell did that guy get down from there in the dark"?

In order to get the most out of a sunset, you will have to stay there until the sun is right the way down and that means either staying put on some summit until dawn or retreating back to the car. Similarly, if you want to shoot sunrise from the summit of Ben Nevis, you will have to climb it in the dark first. It's a basic fact that nobody wants to talk up in between the glorious vistas!

A few years ago, I was out walking with my brother on Great Moss in the Lake District. We'd started late, but it was October so the days were still fairly long. We set out to bag Scafell Pike. After getting to the summit, we headed straight back down without a problem, but as the light dropped we lost the trail and even though we were near it, never found it again. I had packed snaplights and I knew where we were on the map, where the car was and we had a compass. After a brief man tantrum from my sibling, we set about walking on a due south compass bearing holding a snaplight each over our heads, falling over every 3 paces. Much effing and jeffing ensued! We walked though chest high ferns, had to cross 3 rivers and it took 4 hours, but we did navigate right to the car! My brother had left his rag well behind by this time and now he never goes anywhere that isn't paved. I, on the other hand, took this as a lesson hard learned and went right out to buy a head torch! I've been back several times in the daylight and there are so many ravines and waterfalls where we were, it's amazing we didn't die (more than once I did consider killing him when the whining got too much)

So - with this in mind - my essential kit this posting is a good head torch.
I've had 4 or 5 over the years, of various designs and there are several things to look out for when selecting one:

• Look for one with a fully adjustable strap, preferably with a centre strap that goes over the top of the head. The elastic will sag over time and without this, keeping the lamp in place is impossible.

• Go for an LED torch over a standard bulb or halogen. These have become widely available more recently and they offer a better light for less money and the battery life is far better. Nobody wants their lamp to go out half way home (done that, got the T-shirt then used that T-shirt as a bandage!)

• Carry spare batteries! 

• Look for some adjustability so the lamp can be pointed where it's needed.

• Many lamps now come with several bulbs in the array so you can run them brighter when needed or dimmer when you want to save the juice.

• Water is the great killer of head torches. I've used cheap versions and expensive waterproof ones and these days I wouldn't pay over £10. If your cheap torch dies - get another cheap one. I used to own a top of the range Petzel waterproof torch, which was great, but had some drawbacks. The battery pack on the back of the head weighed a ton and as it was pre-LED, the light wasn't great either. In the end the elastic perished way sooner that the torch, rendering it useless anyway. My advice is to buy a good light weight cheap torch and if it rains, run it from under your hood. 

Finally, a head torch will come into it's own while you're setting up your camera in the dark or packing away your gear and unlike a regular torch, it's hands free so you won't have to jam a regular torch in your mouth to see what you're doing - good-times!

I recently spent a morning shooting on a beach (more of this in the next posting) and had to walk 40 minutes along cliffs and then descend to the beach in the dark - but with my torch on, everything went to plan perfectly and I was on the sand and set up as the sun came up - the beach was deserted apart from a single fox.

If you're planning an early or late trip into the countryside, get ahead - get a head torch!
Nothing puts a dampener on the day like a depressed dish fracture of the skull.

Friday 21 December 2012

Get creative - Fun with filters!

One of the best creative additions you can use with your landscape photography, after getting a good wide angle lens, is a range of filters. If you want to get more colour and drama into your skies, or achieve unusual striking effects, filters will open a whole world of possibilities.


There are hundreds of filter effects available for digital and traditional photography. The only limit (apart from the cost) is your imagination! I'll briefly run through the most commonly used filter types and their effects:

Polarising filter

This is probably the most used filter in my bag and will have the biggest impact on your shots. These filters work like polaroid sunglasses, filtering out a section of light from the spectrum and the effects are the same. Skies really pop with a polarising filter fitted and have much more colour with far greater depth to the cloud formations. Also, you can reduce reflections on water.

Once fitted the filters are used by rotating them on the end of the lens until you get the effect you desire. They filter light a bit like a venetian blind, so by spinning the filter round they will filter more or less light, and your image effect will alter significantly. If you only buy one filter - this is the one. There are linear and circular polariser versions available so I'd advise you go for the circular type.

Neutral Density filters

These are designed to cut down the light that enters your camera aperture without adding a colour cast to your image. Again, like sunglasses, they allow certain effects in full light and are available at various strengths as either graduated or full tint versions.

These are used for two main reasons. By adding an ND graduation filter, you can balance your exposures so the skies are not blown out and the foreground too dark. They also add more definition to your skies, although there's no colour boost.

By adding a solid tint ND filter, you can cut down the light entering the lens, and lengthen your exposure time without waiting for less light. This offers all sorts of creative options with moving subjects, typically moving water and seas, or fast moving clouds, giving that ghostly blurred look that's currently fashionable.

UV filters

I've read a lot of conflicting advice on the use of these. Many people advocate adding one on every lens you have as a lens front protector. I bought one and never use it - the effect on your images are negligible and the security offered is minor.

Coloured filters

There are endless coloured filters available to allow you to add a colour effect to your images. I have a couple buy I tend not to use them as I'm not a fan of the unrealistic effects. Probably the most useful would be a tobacco gradient that you can use for sunsets.

Infra Red filters

These work by cutting out the visible and UV portions of white light just allowing the Infra red wavelengths in and can create some beautiful monotone and false colour effects. Green plants appear bright white while the skies go black and really throw out the clouds.

Effects filters

There are a massive range of effects filters available: Star burst filters, soft focus, lens flare, the choice is vast, Many are more suited to other subjects that landscapes but are a great experimental aid.


There are two main routes do go, when considering a filter for your lens:

Screw in filters


These are round filters that, as the name implies, attach to your lens front by the screw thread. They are easy to use, simple to fit and probably the easiest way to start using filters with your camera.
There are a couple of down sides with screw in filters however. If you buy any graduated Neutral density (more about these later) or coloured filters, the horizon line where the graduation ends will typically be in the middle of the filter - so, as you'll need to place this on the horizon line - it will impact badly on composition. I bought a few and found them severely limiting.

Also you're pretty much  constrained to using one filter at a time, so using a polariser in combination with an ND grad is not an option.

I have however used a screw in polariser quite extensively and for me this has been the most useful screw in filter for shooting outside, hand held - unobtrusive and easy to dial in.

Finally, not all lenses have the same diameter across the front of the casing, so you will end up buying filters for each lens you need to use - not a big deal, but worth remembering.


Slide in filter systems


These are much better solutions for landscape filter use, and once you get the hang of using them, can offer endless options to fine tune your final image. Typically, the system will use an  adapter ring screwed to the lens front, that carries the slot in filter holder. Then, the rectangular resin filters slot into the holder guides and can be rotated, or moved up and down to suit.

I find this to be a far more flexible system, allowing more than one filter to be used at any angle or position - the sky's the limit. The only down side here is the systems do look daunting to the beginner at first and you will end up hauling about more gear. You can buy all the individual adapter plates to suit all common lens sizes, so switching the filters to another lens is cheap and easy - often, you can buy the holder systems with a full range of adapter plates.

To finish - you can get all the filters above at wildly varying prices - just look on ebay and you'll see that a single filter can vary in price from £1 to £50 for what appears to be the same thing essentially. The market is flooded with cheap Chinese filters and while these offer the option to experiment without breaking the bank, the quality can't be guaranteed. you can however, buy a whole bunch of cheap filters and experiment with them without costing the earth - find what you like and what works for you, then buy better quality later as you improve.

If image quality is critical, I'd always advise buying from a respected well known manufacturer, so for screw in filters, you can't go far wrong with Hoya and for slide in systems Cokin and Lee's filters are both excellent quality with Lee's having the reputation for pro quality (and higher price).

For the sake of budget, I've gone with a Cokin P filter system and I'll be posting a couple more entries about my experience with this going forward.

Look out for a couple of entries over the Christmas break - I'll be making a few trips out and I have some projects lined up indoors. Hope you enjoy the holidays and get some great festive shots!

If you're enjoying these posts, why not leave me some feedback or click to follow - I'd love to hear from you!


Thursday 20 December 2012

Put you on it - Gary McParland

I just discovered Gary's beautiful work while trolling the interwebs for inspiration, and I am now fully charged up to 11!…


 © Gary McParland

Gary McParland is an Irish fine art landscape photographer based in County Armagh and his exquisite landscape images really capture the essence of the celtic fringes of our islands. 

Gary's website url is: www.garymcparland.com
If you have some time, treat yourself to his fantastic gallery - it really is a treat.

Friday 14 December 2012

Essential Kit No. 3…

Essential Kit No. 3 - a robust memory card holder


Ever wonder what you'd do if you lost the SD card that you'd just spent all day filling? Those opportunities are probably not going to be there again very soon, if at all! Also, nobody wants to drive three hours and hike for another two, only to find they've forgotten to pack empty cards – so it's a good idea to make some kind of special effort to protect your SD cards and manage a selection of them ready for use.

As a digital photographer, your cards are as precious as a traditional photographer's exposed and un-exposed film rolls and they really need to be treated in the same way. They need to be kept clean and secure, not rattling about in the bottom of your bag, in a pocket, stuck to a fluff covered toffee or ground into powder by loose change. Also, they really need to be dry, as moisture will destroy them and then you'll be putting something contaminated into your camera body, so this is one area where you can't be too anal-retentive!

Also, SD cards are relatively fragile in use and can fail at any time leaving you with nothing, so getting into the habit of rotating several cards in and out of use is a good practice to foster so you avoid an "all the eggs in one basket" catastrophic failure. Ideally you want to have a few cards to spread the risk of loosing one to file corruption, so buying several smaller cards (4 or 8mb) is better than one 32mb card in this respect and they're way cheaper as well.

I've bought this 8 slot carrier and have found it to be ideal. I bought it on Amazon - there were plenty of alternative brand options available and it was only £7.50… 


Like all great products that just work without any fanfare, I've been using this for a couple of months and forgotten that it's there - but I'd really miss it if it was gone.

There are several designs available from a load of manufacturers, hard shell and soft wallet types. I think the hard shell design has the edge as it prevents crushing and some are even water resistant or lockable for added security.
 

They're available with a variety of capacities - I plumped for 8 bays but you can get more or less. I liked the "Samsonite" look of the thing and it will accommodate 3 different card formats, which is nice.

As part of my personal routine, I tend to keep my empty cards in the case and put them into individual plastic holders when they're full, but you could just move the cards from one side to the other when they're full for the same affect.


So, in conclusion - a cheap but really useful product for looking after your precious cards - does it's thing inconspicuously without costing the earth - why haven't you bought one already? 


Thursday 13 December 2012

4 seasons in one day…


…well actually, in two! About 2 months ago now, I set out for a planned shoot in Snowdonia (for non UK residents, that the mountainous north east region of Wales), the scenery is majestic and I'd just bought some ND filters that I was itching to try out on some moving water.


As I work full time, I have to plan in any extended days shooting well in advance, so when I heard the weather forecast and saw the massive low swirling just off Ireland, I was concerned! Not to worry, said the BBC weather monkey - no rain until sunday, late afternoon. Perfect, thinks I - leave early - arrive in-country at 10.00 am saturday shoot all day on the slopes of Tryfan - camp overnight - get up early and catch the dawn for another great day clicking away - drive back before the rain. I'd be in and out like the SAS right?

Well - didn't quite work out that way! 

Day one went to plan. Tryfan, for those who have yet to go, is a beautiful mountain and - unusually for Wales and England - sits on it's own, so you can frame it perfectly against a dramatic sky. I found a great position where I could catch fast moving water and Tryfan in the background - the sky was full of interest and I had a great couple of hours experimenting with long exposures – I even managed to not drop anything in the river, of destroy my equipment! All was good. The shot above was the most successful of that batch of exposures and it's my personal favourite from the trip - hope you like it. If you go to my google plus page you can see the colour version, but I think the mono version has the edge.

https://plus.google.com/u/0/103320240261166592824/posts

As the evening drew on, the light was dramatic, with shafts of gold breaking through the building cloud cover and I got some really atmospheric gems. Now, the secret to getting great colour into the sky is to make the most of the low dawn and dusk sun, so if you're away from home in the middle of nowhere, that means an overnight stay. The weather was still fairly warm  - it had even been sunny most of the day - so I had planned to camp in a farm at the foot of the mountain. Them I could set an alarm, get up in the dark and deploy for the glorious dawn I was expecting. I ate my lonely dinner, got into my bag and hunkered down with my i-pod for the night - what can go wrong!

This was where the wheels came off the agenda! That night, not only was it "brass monkey" cold in my tiny one man tent - the wind built to the point where it was actually blowing under the tent with me in it. I put on all my clothes and hoped the tent pegs wouldn't let go. The rain thrashed down for a solid 8 hours and when I finally struggled out at dawn, the cloud was about 15 feet from the ground - I couldn't see the mountain - I couldn't see my car! It was a wash out, literally!

I paid the farmer - possibly the most miserable man in Wales - £5 for the privilege of laying in his mud and packed up my sodden camp in the refreshing 45 degree rain - got in the car and got the f*** out of Dodge - there was no chance of any more shooting and you've never seen two more different days. I drove off to find a full english. And this is the point of my tale - sometimes the random factor that you just can't allow for, will destroy your best laid plans! The weather man sometimes gets things 24 hours out of whack and all we can do is be as prepared as we can, take our opportunities where we can and with some luck, bag a couple of great images!

Over the next couple of post I'll be looking at filters and how they can be used to add some great dramatic enhancement to your landscape shots. I'll put up another "put you on it" and "essential kit" and I have a top ten tips posting planned so you can make the most of your outdoor shoots and plan for success!

Just make sure to check the weather first!

If you're enjoying these posts, why not leave me some feedback - I'd like to hear from you - and why not click to follow.  Good shooting!

Monday 3 December 2012

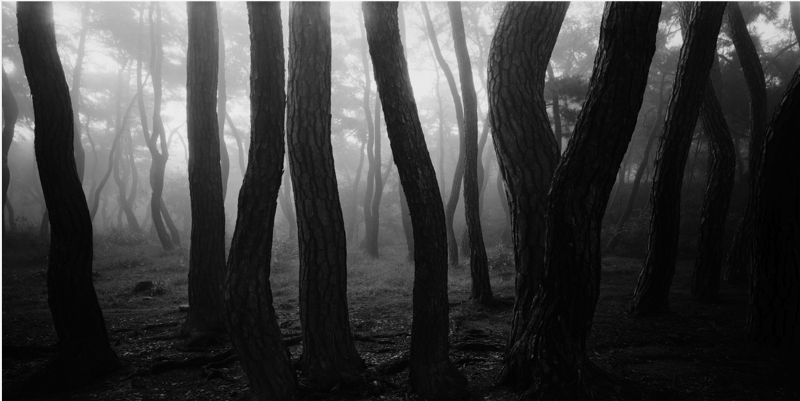
Put you on it – Bae Bien-U

I stumbled onto a link for this site a couple of weeks ago and wanted to share it with you - it's a real treat.


© Bae Bien-U

Bae Bien-U is a Professor of photography at Seoul Institute of the Arts, Korea. His online portfolio is filled with beautiful, dream-like mono imagery that I would urge you to check out - you will not be disappointed!